Add data to the interview iession
Retrieve Interview Engine screens
Investigate an Interview Engine goal
Integrate Interview Engine with an external data source
Generate an Interview Engine decision document
Retrieve Interview Engine commentary
Handle Interview Engine events
Install an Interview Engine plug-in
Before setting out to create an interview session, you should familiarize yourself with the Interview Engine by reading the topic. Understand the Interview Engine.
The first step when working with the Interview Engine is to create an interview session; this is done as follows:
This is illustrated by the following code sample:
Code sampleimport com.oracle.determinations.interview.engine.*;
/**
* Code sample illustrating how to create in Interview Session
*/
public class SampleSessionCreator {
//the path to directory containing the rulebases
private static final String RULEBASE_PATH = "rulebases";
//The id of the rulebase we want to create a session for
private static final String RULEBASE_ID = "SuperSimple";
//The locale that we want to use for this session
private static final String LOCALE = "en-GB";
/**
* Creates and returns an InterviewSession for the SuperSimple rulebase
* @return the InterviewSession
*/
public InterviewSession createSession () {
/************************************************
* Step 1. Create the Configuration object
************************************************/
EngineConfiguration configuration = new EngineConfiguration();
//set the path to load the rulebases from
configuration.setRulebaseDirectory(RULEBASE_PATH);
//signifies that we want to load rulebases from the file system and use hotswapping mode
configuration.setLoadRulebaseFromClasspath(false);
configuration.setCacheLoadedRulebases(false);
/************************************************
* Step 2. Create an InterviewEngine
************************************************/
InterviewEngine engine = InterviewEngineFactory.createInstance(configuration);
SecurityToken token = engine.getSecurityService().authenticateUser("user");
/************************************************
* Step 3. Get the rulebase
************************************************/
InterviewRulebase superSimpleRulebase = engine.getRulebaseService().getRulebase(token, RULEBASE_ID);/************************************************
* Step 4. Create the Interview Session
************************************************/
InterviewSession session = engine.createSession(superSimpleRulebase, LOCALE, token);
return session;
}
}
There are two ways of adding/modifying data for an interview session:
Add data directly to the session
The most common way of adding data to an interview session is to do so by populating an interview screen and submitting it using the following method:
TransactionResult InterviewSession.submit(InterivewScreen screen)
Calls to this method trigger a transaction which attempts to submit the data contained on the screen in the rule session. The TransactionResult that is returned provides an indication as to whether the transaction succeeded or failed and a list of any errors, warnings and rule events that fired during the transaction.
InterviewScreens can contain instances of InterivewInputControl which are bound to a particular attribute. Adding values to the screen is simply a matter of calling the following on the InputInterviewControl and supplying the value corresponding to that controls attribute:
void setValue(Object v);
on the InputInterviewControl and supplying the value corresponding to that controls attribute.
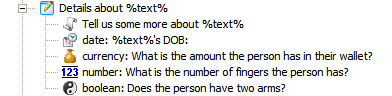
The sample code that follows, illustrates how to add values to the following screen:
Code sampleimport com.oracle.determinations.interview.engine.screen.InterviewScreen;
import com.oracle.determinations.interview.engine.screen.InputInterviewControl;
import com.oracle.determinations.interview.engine.InterviewSession;
import com.oracle.determinations.interview.engine.data.TransactionResult;
import com.oracle.determinations.engine.Attribute;
import java.util.Calendar;
import java.util.GregorianCalendar;
import java.util.Date;
import java.util.HashMap;
public class ScreenDataExample {
public void InputValueExample(InterviewScreen screen) {
Calendar calendar = new GregorianCalendar();
calendar.set(1999, 5, 1, 0, 0, 0);
calendar.clear(Calendar.MILLISECOND);
/***************
* Input values
***************/
Date dob = calendar.getTime();
Double money = new Double(150.20);
Double fingers = new Double(10.0);
Boolean hasTwoArms = Boolean.TRUE;
//map values against the ID's of the attributes to which they belong
HashMap<String, Object> values = new HashMap<String, Object>(4);
values.put("date", dob);
values.put("currency", money);
values.put("number", fingers);
values.put("boolean", hasTwoArms);
//Iterate through the controls on the screen and set the appropriate values
for(Object oCtrl : screen.getControls()){
if(oCtrl instanceof InputInterviewControl){
InputInterviewControl interviewCtrl = (InputInterviewControl)oCtrl;
Attribute controlAttribute = interviewCtrl.getAttribute();
interviewCtrl.setValue(values.get(controlAttribute.getName()));
}
}
//submit the screen
InterviewSession session = screen.getInteractiveSession();
TransactionResult result = session.submit(screen);
//process result
}
}
The ContainmentRelationshipInterviewControl is the control that represents the creation of new entity instances during an interview. Entities, along with their relationships, can be added, edited and removed using the methods provided by this control. When created, this control will automatically be populated with the relevant entity instances currently held in the session. Each instance of the entity represented on the screen is encapsulated by EntityInstanceInterviewControl which, in turn, contains the list of controls bound to that entity instance.
The sample code that follows, illustrates how to add, delete and edit existing entity information for the following screen:
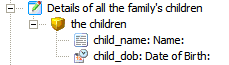
Code samplepublic void EntityCollectExample(InterviewScreen screen) {
//Get the Containment Collect Control which is the first control on this screen
ContainmentRelationshipInterviewControl entityCollect = (ContainmentRelationshipInterviewControl) screen.getControls().get(0);
//Add an instance of the child 'Fred'
EntityInstanceInterviewControl fredInstance = entityCollect.addNewInstance("Fred");
//add values for Fred's name and date of birth which is 25 December 1990
InputInterviewControl fredNameCtrl = (InputInterviewControl) fredInstance.getControls().get(0);
fredNameCtrl.setValue("Fred");
InputInterviewControl fredDobCtrl = (InputInterviewControl) fredInstance.getControls().get(1);
Calendar calendar = new GregorianCalendar();
calendar.set(1990, 12, 25, 0, 0, 0);
calendar.clear(Calendar.MILLISECOND);
fredDobCtrl.setValue(calendar.getTime());
//Get the existing instance 'Liz' and correct her name to be 'Elizabeth'
EntityInstanceInterviewControl lizInstance = entityCollect.getInstance("Liz");
InputInterviewControl lizNameCtrl = (InputInterviewControl) lizInstance.getControls().get(0);
lizNameCtrl.setValue("Elizabeth");
//finally remove the instance of the child walter
entityCollect.deleteInstance("Walter");
//submit the screen
//submit the screen
InterviewSession session = screen.getInteractiveSession();
TransactionResult result = session.submit(screen);
//process result
}This sample illustrates how look up entity instances in the underlying rule session:
/**
* Creates and Delete a set of entity instances on an entity collect screen
*
* @param screen - the entity collect screen to be submitted
* @param instancesToAdd - a list of strings representing the list of instance ids of the entity instance to add
* @param instancesToDelete - a list of strings representing the list of instances ids of the entity instances to delete
*/
public void workingWithEntityCollectSample(InterviewScreen screen, List<String> instancesToAdd, List<String>
instancesToDelete) {
//Get the Containment Collect Control which is the first control on this screen
ContainmentRelationshipInterviewControl entityCollectControl = (ContainmentRelationshipInterviewControl)
screen.getControls().get(0);
//Navigating between the interview data model's entity instance and that of the underlying rule session is done via the means of
//an EntityInstanceIdentifier, so cache a list of these for each instance we create so that we can refer back to them later
List<InterviewEntityInstanceIdentifier> newInstanceIds = new ArrayList(instancesToAdd.size());
for (String instanceId : instancesToAdd) {
EntityInstanceInterviewControl newInstanceCtrl = entityCollectControl.addNewInstance(instanceId);
newInstanceIds.add(newInstanceCtrl.getContext());
//set some values for this control...
}
//Delete entity instances
for(String instanceId : instancesToDelete)
entityCollectControl.deleteInstance(instanceId);
//submit the screen
InterviewSession session = screen.getInteractiveSession();
TransactionResult result = session.submit(screen);
if(result.isSuccess()){
//the transaction succeeded so we can now iterate over our newly created entity instances
for(InterviewEntityInstanceIdentifier identitfier : newInstanceIds){
EntityInstance entityInstance = identitfier.findEntityInstance(session);
if(entityInstance == null)
throw new InterviewEngineException("could not find newly created instance in the session");
//do something with the entity instance
}
//we can even check to make sure that or deleted instances were actually deleted.
for(String instanceId : instancesToDelete){
InterviewEntityInstanceIdentifier identifier = newInterviewEntityInstanceIdentifier(entityCollectControl.
getRelationship().getTargetEntity().getName(), instanceId);
EntityInstance entityInstance = identifier.findEntityInstance(session);
if(entityInstance != null)
throw new InterviewEngineException("This instance was supposed to be deleted!")
}
}
}
The ReferenceRelationshipInterviewControl represents a control that allows entity instances to be related together via a specified relationship. Unlike the ContainmentRelationshipInterviewControl it does not allow new instances of the relationship's target to be created. When created, the ReferenceRelationshipInterviewControl will be populated with the list of all possible targets of relationship, along with all relevant relationships already held in the session. Relationship instances can the be added or removed using the methods supplied by this control.
The second way of modifying the data held in the interview session is via the following method:
TransactionResult InterviewSession.submit(InterviewUserData dataModel)
This method allows for data currently held in the system to be modified independently of a given screen model. Like the previous method the data contained in the InterviewUserData provided to this method is considered a single, atomic transaction.
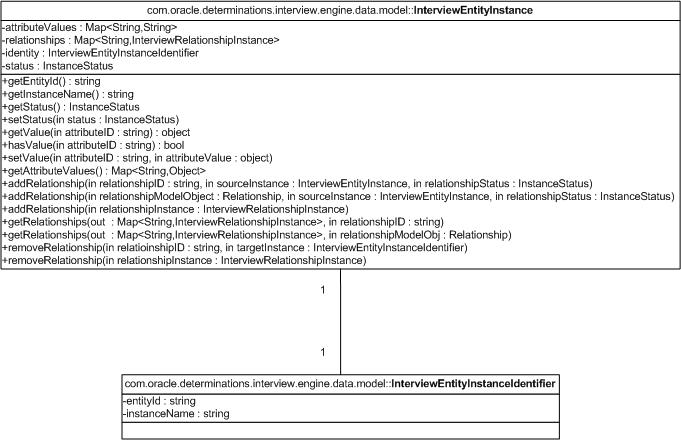
The InterviewUserData is the Interview Engine's abstracted representation of the data currently held in the session. In the context of modifying data within the system, the user data model represents the delta of the changes that are to be performed in the transaction. In addition to the InterviewUserData object the Interview Engine's data model contains the following key classes:
As demonstrated in Construct the InterviewUserData below,the InterviewEntityInstance object is the key building block when constructing the InterviewUserData, and all modification can be done through the InterviewEntityInstance.
Below is a class diagram of the InterviewEntityInstance with key class members. Note the following points when analyzing it:
Conceptually, building the InterviewUserData is commonly constructed as per the sequence below:
When constructing the InterviewUserData with the above steps, the following behaviors need to be kept in mind:
The following sample code demonstrates the steps above. Note that for demonstration's sake, the code is simplified and does not incorporate best practices. See Modifying the instance data - sample code for best practice techniques for constructing the InterviewUserData.
Code sampleActual code representation of concept//Rulebase Model:
//- Entity 'child' with attributes name and age
//- Entity 'school' with attributes name and address
//- Relationship 'childsschool' that connects 'child' entity to target 'school' entity
//1.
InterviewUserData iuData = new InterviewUserData();
//2.
InterviewEntityInstance entInst1 = new InterviewEntityInstance("child", "1"); //2a
entInst1.setStatus(InstanceStatus.ADD); //2b
entInst1.setValue("name", "Joe");//2c
entInst1.setValue("age", "10");//2c
iuData.addInstance(entInst1);//2d
InterviewEntityInstance entInst2 = new InterviewEntityInstance("child", "2"); //2a
entInst2.setStatus(InstanceStatus.ADD); //2b
entInst2.setValue("name", "Bill");//2c
entInst2.setValue("age", "12");//2c
iuData.addInstance(entInst2);//2d
InterviewEntityInstance entInst3 = new InterviewEntityInstance("school", "1"); //2a
entInst3.setStatus(InstanceStatus.ADD); //2b
entInst3.setValue("name", "Summer Heights High");//2c
entInst3.setValue("address", "6 Summer Heights St, Summer Heights");//2c
iuData.addInstance(entInst3);//2d
InterviewEntityInstance entInst4 = new InterviewEntityInstance("school", "2"); //2a
entInst4.setStatus(InstanceStatus.ADD); //2b
entInst4.setValue("name", "Old Summer Heights High");//2c
entInst4.setValue("address", "10 Summer Heights St, Summer Heights");//2c
iuData.addInstance(entInst4);//2d
//3.
entInst1.addRelationship("childsschool", entInst3, InstanceStatus.ADD);//3c
entInst2.addRelationship("childsschool", entInst4, InstanceStatus.ADD);//3c
//The relationship below would be illegal as childsschool relationship expects a 'child' source entity instance and a 'school' target entity instence. This is a fundamental Rulebase authoring concept
//entInst1.addRelationship("childsschool", entInst2, InstanceStatus.ADD);Considering the session data now has the new instance data above after adding the entities and relationships, the following sample code demonstrates how to modify existing entity instances, its attributes, and relationships:
Modifying existing entity instances and relationships//Changing Bill's school
InterviewUserData iuData = new InterviewUserData();
//no attribute value modifications to the instance below
InterviewEntityInstance entInst2 = new InterviewEntityInstance("child", "2"); //2a
entInst2.setStatus(InstanceStatus.EXISTING); //2b
iuData.addInstance(entInst2);//2d
//attribute value modification to the instance below
InterviewEntityInstance entInst3 = new InterviewEntityInstance("school", "1"); //2a
entInst3.setStatus(InstanceStatus.EXISTING); //2b
entInst3.setValue("name", "New Summer Heights High");//2c
iuData.addInstance(entInst3);//2d
InterviewEntityInstance entInst4 = new InterviewEntityInstance("school", "2"); //2a
entInst4.setStatus(InstanceStatus.EXISTING); //2b
iuData.addInstance(entInst4);//2d
//The source and target instances have been defined,which makes it much easier to add and delete relationships
entInst2.addRelationship("childsschool", entInst4, InstanceStatus.DELETE);//Delete old relationship to old school
entInst2.addRelationship("childsschool", entInst3, InstanceStatus.ADD); //Create new relationship to new school
//Deleting Joe the child
InterviewEntityInstance entInst1 = new InterviewEntityInstance("child", "1"); //2a
entInst1.setStatus(InstanceStatus.DELETE); //2b
iuData.addInstance(entInst1);//2d
The following are key points to keep in mind when constructing the InterviewUserData:
The fundamental idea underpinning all the best practice concepts below is that it is better to check for possible errors during the construction of the modifications, by checking the model of the modification data against the rulebase model.
Failure to check for errors during the construction of the modification will lead to the RuleSessionManager having errors when attempting to apply the modifications to the session. The RuleSessionManager has to then rollback if there are any errors. Rollbacks can potentially fail, which means the user loses all session data whereas handled errors during the 'construction' of the modifications can be properly handled by the developer.
The developer can check the modification data against the rulebase model data, but not the instance data in the session. Possible errors with instance data (for example, trying to add a duplicate entity instance) can only be discovered once the RuleSessionManager is actually applying the modifications.
Verify entity instance modifications
When creating an InterviewEntityInstance, check that the entity exists in the rulebase model.
Code sampleVerify entity instance modifications - sample code
//DataAdaptor load()
public InterviewUserData load(SecurityToken token, String caseID,
InterviewRulebase rulebase)
//Get the underlying Rulebase object
Rulebase detEngineRulebase = rulebase.getRulebase();
//Check that an Entity ID 'child' exists first before creating the InterviewEntityInstance
Entity checkEntity = rulebase.getEntity("child");
if(checkEntity != null)
{
//continue ceating InterviewEntitInstance
InterviewEntityInstance entityInstance = new InterviewEntityInstance("child", "1");
entityInstance.setStatus(InstanceStatus.ADD);
...
}
else
{
//the entity 'child' doesn't exist, do something to fix it or throw an error
}
Verify attribute value modifications
When adding attribute values to an InterviewEntityInstance, check that the attribute exists for the entity instance.
Code sampleVerify attribute value modifications - sample code
//DataAdaptor load()
public InterviewUserData load(SecurityToken token, String caseID,
InterviewRulebase rulebase)
//Get the underlying Rulebase object
Rulebase detEngineRulebase = rulebase.getRulebase();
//Check that an Entity ID 'child' exists first before creating the InterviewEntityInstance
Entity checkEntity = rulebase.getEntity("child");
if(checkEntity != null)
{
//continue ceating InterviewEntitInstance
InterviewEntityInstance entityInstance = new InterviewEntityInstance("child", "1");
entityInstance.setStatus(InstanceStatus.EXISTING); //Checking that this already exists, and also the entity instance needs to be instantiated so attribute values can be added to it
//Attempting to add attribute values to 'entityInstance'
Attribute checkAttribute = checkEntity.getAttribute("name");
if(checkAttribute != null)
{
entityInstance.setValue("name", "Joe");
}
else
{
//the attribute 'name' does not exist in the entity 'child', do something to fix it or throw an error
}
}
else
{
//the entity 'child' doesn't exist, do something to fix it or throw an error
}
Adding the above attribute value was simple, because the attribute 'name' is a Text ruleengine datatype, and the corresponding Java/.NET type is String (see Formatter Plugin).
In the following sample code, we check the ruleengine datatype (HaleyType) of the attribute, and parse it accordingly from String format -> Object. A basic parser method (simpleParse) has been created which converts the String value to the correct Object value using the HaleyType of the attribute.
Code sampleVerify attribute value modifications - sample codepublic InterviewUserData load(SecurityToken token, String caseID,
InterviewRulebase rulebase)
{
//Get the underlying Rulebase object
Rulebase detEngineRulebase = rulebase.getRulebase();
//Check that an Entity ID 'child' exists first before creating the InterviewEntityInstance
Entity checkEntity = rulebase.getEntity("child");
if(checkEntity != null)
{
//continue ceating InterviewEntitInstance
InterviewEntityInstance entityInstance = new InterviewEntityInstance("child", "1");
entityInstance.setStatus(InstanceStatus.EXISTING); //Checking that this already exists, and also the entity instance needs to be instantiated so attribute values can be added to it
//Attempting to add attribute values to 'entityInstance'
Attribute checkAttribute = checkEntity.getAttribute("name");
if(checkAttribute != null)
{
entityInstance.setValue("dateofbirth", simpleParse("10/10/1990", checkAttribute.getValueType()));
}
else
{
//the attribute 'name' does not exist in the entity 'child', do something to fix it or throw an error
}
}
else
{
//the entity 'child' doesn't exist, do something to fix it or throw an error
}
...
}//end function
//Really simple parser to convert a String to the correct Object value, does not handle Time of Day (Haley.TIMEOFDAY) types
public Object simpleParse(String value, byte haleyType)
{
if(haleyType == HaleyType.BOOLEAN)
{
if (value.toLowerCase().equals("true") || value.toLowerCase().equals("yes")) {
return Boolean.TRUE;
} else if (value.toLowerCase().equals("false") || value.toLowerCase().equals("no")) {
return Boolean.FALSE;
}
}
else if(haleyType == HaleyType.TEXT)
{
return value;
}
else if(haleyType == HaleyType.NUMBER || haleyType == HaleyType.CURRENCY)
{
return Double.valueOf(value);
}
else if(haleyType == HaleyType.DATE || haleyType == HaleyType.DATETIME)
{
return Date.valueOf(value);
}
return null;
}
Verify relationship modifications
When adding relationship modifications, check that the entity of the source and target entity instances match the expected entity source/target of the relationship.
Code sampleVerify relationship modifications - sample code//DataAdaptor load()
public InterviewUserData load(SecurityToken token, String caseID,
InterviewRulebase rulebase)
//Get the underlying Rulebase object
Rulebase detEngineRulebase = rulebase.getRulebase();
Entity childEntity = rulebase.getEntity("child");
Entity schoolEntity = rulebase.getEntity("school");
if(childEntity != null && schoolEntity != null)
{
//continue creating InterviewEntitInstance
InterviewEntityInstance childEntityInstance = new InterviewEntityInstance("child", "1");
childEntityInstance.setStatus(InstanceStatus.EXISTING); //Checking that this already exists, and also the entity instance needs to be instantiated so relationship modifications can be added to it
InterviewEntityInstance schoolEntityInstance = new InterviewEntityInstance("school", "1");
schoolEntityInstance.setStatus(InstanceStatus.EXISTING); //Checking that this already exists, and also the entity instance needs to be instantiated so relationship modifications can be added to it
//Attempting to add a new relationship between child and school
Relationship relationship = childEntity.getRelationship("childsschool");
String sourceEntityName = childEntity.getName();
String targetEntityName = schoolEntity.getName();
//Check
if(relationship.getSourceEntity().getName().equals(sourceEntityName) &&
relationship.getTargetEntity().getName().equals(targetEntityName)
)
{
childEntityInstance.addRelationship("childsschool", schoolEntityInstance, InstanceStatus.ADD);
//Or could have been childEntityInstance.addRelationship(relationship, schoolEntityInstance, InstanceStatus.ADD);
}
else
{
//the entity of thesource and/or target instance is invalid for the relationship "childsschool"
}
}
else
{
//the entity 'child' or 'school' doesn't exist, do something to fix it or throw an error
}
The following code samples show a conversion of the simple sample code found in Constructing InterviewUserData samples above, to best-practice.
Code sampleModifying the instance data - sample code - add some data//Rulebase Model:
//- Entity 'child' with attributes name and age
//- Entity 'school' with attributes name and address
//- Relationship 'childsschool' that connects 'child' entity to target 'school' entity
InterviewUserData iuData = new InterviewUserData();
Rulebase rulebase = interviewSession.getRulebase().getRulebase();
//Add child entity with name=Joe and age=10
Entity checkEntity = rulebase.getEntity("child");
if(checkEntity != null)
{
//continue creating InterviewEntitInstance
InterviewEntityInstance entInst1 = new InterviewEntityInstance("child", "1");
entInst1.setStatus(InstanceStatus.ADD);
iuData.addInstance(entInst1);
//Attempting to add attribute values
Attribute checkAttribute = checkEntity .getAttribute("name");
if(checkAttribute != null)
{
entInst1.setValue("name", simpleParse("Joe", checkAttribute.getValueType()));
}
else
{
//the attribute 'name' does not exist in the entity 'child'
}
checkAttribute = checkEntity .getAttribute("age");
if(checkAttribute != null)
{
entInst1.setValue("age", simpleParse("10", checkAttribute.getValueType()));
}
else
{
//the attribute 'name' does not exist in the entity 'child'
}
}
else
{
//the entity 'child' doesn't exist, do something to fix it or throw an error
}
//Add a school instance with name=Summer Heights High, address=1 Summer St, Summer Heights
checkEntity = rulebase.getEntity("school");
if(checkEntity != null)
{
//continue creating InterviewEntitInstance
InterviewEntityInstance entInst2 = new InterviewEntityInstance("school", "1");
entInst2.setStatus(InstanceStatus.ADD);
iuData.addInstance(entInst2);
//Attempting to add attribute values
Attribute checkAttribute = checkEntity .getAttribute("name");
if(checkAttribute != null)
{
entInst2.setValue("name", simpleParse("Summer Heights High", checkAttribute.getValueType()));
}
else
{
//the attribute 'name' does not exist in the entity 'school'
}
checkAttribute = checkEntity .getAttribute("address");
if(checkAttribute != null)
{
entInst2.setValue("address", simpleParse("1 Summer St, Summer Heights", checkAttribute.getValueType()));
}
else
{
//the attribute 'name' does not exist in the entity 'school'
}
}
else
{
//the entity 'school' doesn't exist, do something to fix it or throw an error
}
//Add a relationship between Joe and Summer Heights High
Relationship relationship = entInst1.getRelationship("childsschool");
String sourceEntityName = entInst1.getName();
String targetEntityName = entInst2.getName();
//Check
if(relationship.getSourceEntity().getName().equals(sourceEntityName) &&
relationship.getTargetEntity().getName().equals(targetEntityName)
)
{
entInst1.addRelationship("childsschool", entInst2, InstanceStatus.ADD);
}
else
{
//the entity of thesource and/or target instance is invalid for the relationship "childsschool"
}
...
...
//Really simple parser to convert a String to the correct Object value, does not handle Time of Day (Haley.TIMEOFDAY) types
public Object simpleParse(String value, byte haleyType)
{
if(haleyType == HaleyType.BOOLEAN)
{
if (value.toLowerCase().equals("true") || value.toLowerCase().equals("yes")) {
return Boolean.TRUE;
} else if (value.toLowerCase().equals("false") || value.toLowerCase().equals("no")) {
return Boolean.FALSE;
}
}
else if(haleyType == HaleyType.TEXT)
{
return value;
}
else if(haleyType == HaleyType.NUMBER || haleyType == HaleyType.CURRENCY)
{
return Double.valueOf(value);
}
else if(haleyType == HaleyType.DATE || haleyType == HaleyType.DATETIME)
{
return Date.valueOf(value);
}
return null;
}Modifying the instance data - sample code (modify existing data from first sample code)//Rulebase Model:
//- Entity 'child' with attributes name and age
//- Entity 'school' with attributes name and address
//- Relationship 'childsschool' that connects 'child' entity to target 'school' entity
InterviewUserData iuData = new InterviewUserData();
Rulebase rulebase = interviewSession.getRulebase().getRulebase();
//Check child entity '1' exists, change his age to 14
Entity checkEntity = rulebase.getEntity("child");
if(checkEntity != null)
{
//continue creating InterviewEntitInstance
InterviewEntityInstance entInst1 = new InterviewEntityInstance("child", "1");
entInst1.setStatus(InstanceStatus.EXISTING);
iuData.addInstance(entInst1);
//Attempting to add attribute values to be modified
Attribute checkAttribute = checkEntity .getAttribute("age");
if(checkAttribute != null)
{
entInst1.setValue("age", simpleParse("14", checkAttribute.getValueType()));
}
else
{
//the attribute 'age' does not exist in the entity 'child'
}
}
else
{
//the entity 'child' doesn't exist, do something to fix it or throw an error
}
//Add a school instance with name=Summer Heights College, address=1 College St, Summer Heights
checkEntity = rulebase.getEntity("school");
if(checkEntity != null)
{
//Check that Summer Heights High still exists
InterviewEntityInstance entInst2 = new InterviewEntityInstance("school", "1");
entInst2.setStatus(InstanceStatus.EXISTING);
iuData.addInstance(entInst2);
InterviewEntityInstance entInst3 = new InterviewEntityInstance("school", "2");
entInst3.setStatus(InstanceStatus.ADD);
iuData.addInstance(entInst3);
//Attempting to add attribute values
Attribute checkAttribute = checkEntity .getAttribute("name");
if(checkAttribute != null)
{
entInst3.setValue("name", simpleParse("Summer Heights College", checkAttribute.getValueType()));
}
else
{
//the attribute 'name' does not exist in the entity 'school'
}
checkAttribute = checkEntity .getAttribute("address");
if(checkAttribute != null)
{
entInst3.setValue("address", simpleParse("10 Summer St, Summer Heights", checkAttribute.getValueType()));
}
else
{
//the attribute 'name' does not exist in the entity 'school'
}
}
else
{
//the entity 'school' doesn't exist, do something to fix it or throw an error
}
//Move Joe from Summer Heights High to Summer Heights College
Relationship relationship = entInst1.getRelationship("childsschool");
String sourceEntityName = entInst1.getName();
String targetEntityName = entInst2.getName();
//Delete relationship of Joe to Summer Heights High and add relationship to Summer Heights College
if(relationship.getSourceEntity().getName().equals(sourceEntityName) &&
relationship.getTargetEntity().getName().equals(targetEntityName) )
{
entInst1.addRelationship("childsschool", entInst2, InstanceStatus.DELETE);
entInst1.addRelationship("childsschool", entInst3, InstanceStatus.ADD);
}
else
{
//the entity of thesource and/or target instance is invalid for the relationship "childsschool"
}
...
...
//Really simple parser to convert a String to the correct Object value, does not handle Time of Day (Haley.TIMEOFDAY) types
public Object simpleParse(String value, byte haleyType)
{
if(haleyType == HaleyType.BOOLEAN)
{
if (value.toLowerCase().equals("true") || value.toLowerCase().equals("yes")) {
return Boolean.TRUE;
} else if (value.toLowerCase().equals("false") || value.toLowerCase().equals("no")) {
return Boolean.FALSE;
}
}
else if(haleyType == HaleyType.TEXT)
{
return value;
}
else if(haleyType == HaleyType.NUMBER || haleyType == HaleyType.CURRENCY)
{
return Double.valueOf(value);
}
else if(haleyType == HaleyType.DATE || haleyType == HaleyType.DATETIME)
{
return Date.valueOf(value);
}
return null;
}
Screens in the Interview Engine are managed the Screen Service which provides all the methods to retrieve each of the different screens found in an Interview.
The screen service provides the ability to return question screens by id, by attribute or by relationship, which is illustrated in the following example:
Code sampleimport com.oracle.determinations.interview.engine.data.model.InterviewEntityInstanceIdentifier;
import com.oracle.determinations.interview.engine.screen.InterviewScreen;
import com.oracle.determinations.engine.Rulebase;
import com.oracle.determinations.engine.Attribute;
import com.oracle.determinations.engine.Relationship;
public class GetQuestionScreenSample {
public void getQuestionScreens(InterviewSession session){
/*************************************
* Get Screen by ID
*************************************/
//The ID of the screen. The first parameter indicates that we want a question screen and the second is the rulebase ID of the screen. The final two
//parameters identify the entity instance context of the screen, in this case the instance named 'bob' in the entity 'person'.
String screenId = "qs$details$person$bob";
InterviewScreen screen = session.getScreenService().getScreen(screenId);
/*******************************************************
* Get All Screen that collect the attribute 'person_name'
* in the instance 'bob' of the 'person' entity
*******************************************************/
InterviewEntityInstanceIdentifier personBobContext = new InterviewEntityInstanceIdentifier("person", "bob");
Rulebase determinationsRulebase = session.getRulebase().getRulebase();
Attribute personNameAttr = determinationsRulebase.getAttribute("person_name", "person");
InterviewScreen[] personNameScreens = session.getScreenService().getAllScreens(personNameAttr, personBobContext);
/*******************************************************
* Get All Screen that collect the relationship 'children'
* in the instance 'fred' of the 'person' entity
*******************************************************/
InterviewEntityInstanceIdentifier personFredContext = new InterviewEntityInstanceIdentifier("person", "fred");
Relationship relationshipChildren = determinationsRulebase.getRelationship("children", "person");
InterviewScreen[] childrenScreens = session.getScreenService().getAllScreens(relationshipChildren, personFredContext);
}
}
Every interview has a default summary screen which can be accessed by calling:
ScreenService.getDefaultSummaryScreen()
If no default summary screen has been created, the Interview Engine will automatically generate one containing all the top level goals found in the Global Entity Instance. In the case where multiple summary screens have been authored, then non-default summary screens can retrieved by screen Id.
Like summary screens, every interview also has a default data review screen which can be accessed by calling:
ScreenService.getDefaultDataReviewScreen()
The Interview Engine will automatically generate a default data review screen containing all user set data, arranged by entity instance, if one was not explicitly authored. If multiple data review screens have been authored, the non-default screens can be accessed by Id.
Retrieving decision reports in the Interview Engine are done by asking for a decision report screen for a particular attribute or relationship. The Screen Service provides the following methods retrieve a decision report screen:
Code sample/**
* Returns a decision report screen for the specified attribute instance
*
* @param attr the attribute
* @param context the entity instance context of the attribute
* @return a screen containing the decision report for the specified attribute
*/
InterviewScreen getDecisionReportScreen(Attribute attr, InterviewEntityInstanceIdentifier context, DecisionReportFlag flags);
/**
* Returns a decision report screen for the specified attribute instance
*
* @param attr the attribute
* @param context the entity instance context of the attribute
* @param flags the decision report flas
* @param ignoreInvisible set to <code>true</code> if the invisible operator should be ignored
* @param ignoreSilent set to <code>true</code> if the silent operator should be ignored
* @return a screen containing the decision report for the specified attribute
*/
InterviewScreen getDecisionReportScreen(Attribute attr, InterviewEntityInstanceIdentifier context, DecisionReportFlag flags, boolean ignoreSilent, boolean ignoreInvisible);
/**
* Returns a decsion report screen for the specified relationship instance
*
* @param rel
* @param context the entity instance context of the relationship's source
* @param flags the decision report flas
* @return a screen containing the decision report for the specified relationship
*/
InterviewScreen getDecisionReportScreen(Relationship rel, InterviewEntityInstanceIdentifier context, DecisionReportFlag flags);
/**
* Returns a decision report screen for the specified relationship instance
*
* @param rel the relationship
* @param context the entity instance context of the relationship's source
* @param flags the decision report flas
* @param ignoreInvisible set to <code>true</code> if the invisible operator should be ignored
* @param ignoreSilent set to <code>true</code> if the silent operator should be ignored
* @return a screen containing the decision report for the specified attribute
*/
InterviewScreen getDecisionReportScreen(Relationship rel, InterviewEntityInstanceIdentifier context, DecisionReportFlag flags, boolean ignoreSilent, boolean ignoreInvisible);
/**
* Returns a decision report screen for a specific goal
* @param goal the goal
* @param flags the decision report flags
* @return the decision report screen for the goal, or <code>null</code> if no such screen exists.
*/
InterviewScreen getDecisonReportScreen(InterviewGoal goal, DecisionReportFlag flags);
/**
* Returns a decision report screen for a specific goal
* @param goal the goal
* @param flags the decision report flags
* @param ignoreInvisible set to <code>true</code> if the invisible operator should be ignored
* @param ignoreSilent set to <code>true</code> if the silent operator should be ignored
* @return the decision report screen for the goal, or <code>null</code> if no such screen exists.
*/
InterviewScreen getDecisionReportScreen(InterviewGoal goal, DecisionReportFlag flags, boolean ignoreSilent, boolean ignoreInvisible);
The list of goals that are able to be investigated in Interview Session are managed by the Goal Service. The Goal Service provides the ability to return a goal based on ID or goal state. The goal service can also provide a list of all top level goals in the Interview Session. A top level goal is either a top level attribute instance or a flow goal.
Goals can also be accessed via the goal control(s) on a summary screen.
Having understood the fundamentals of how the Interview Engine works, conducting an interview is a straight forward process as shown in the following flow diagram:

Code sampleThis code sample illustrates how to conduct a basic investigation for the rulebase found in the SuperSimple.zip sample.
import com.oracle.determinations.interview.engine.local.AttributeGoal;
import com.oracle.determinations.interview.engine.data.TransactionResult;
import com.oracle.determinations.interview.engine.data.model.InterviewEntityInstanceIdentifier;
import com.oracle.determinations.interview.engine.screen.*;
import com.oracle.determinations.interview.util.StringUtils;
import com.oracle.determinations.engine.Attribute;
import com.oracle.determinations.engine.DecisionReportFlag;
import java.util.*;
/**
* Simple Example of how to drive a basic investigation
*/
public class InterviewExample {
//the path to directory containing the rulebases
private static final String RULEBASE_PATH = "rulebases";
//The id of the rulebase we want to create a session for
private static final String RULEBASE_ID = "SuperSimple";
//The locale that we want to use for this session
private static final String LOCALE = "en-GB";
public static void main(String[] args) {
/***************
* Input values
***************/
String name = "Bob";
Calendar calendar = new GregorianCalendar();
calendar.set(1999, 5, 1, 0, 0, 0);
calendar.clear(Calendar.MILLISECOND);
Date dob = calendar.getTime();
Double money = new Double(150.20);
Double fingers = new Double(10.0);
Boolean hasTwoArms = Boolean.TRUE;
//map values against the ID's of the attributes to which they belong
HashMap<String, Object> values = new HashMap<String, Object>(5);
values.put("text", name);
values.put("date", dob);
values.put("currency", money);
values.put("number", fingers);
values.put("boolean", hasTwoArms);
//Create the session
InterviewSession session = createSession();
//Get the default summary screen and extract the goal from it
InterviewScreen summary = session.getScreenService().getDefaultSummaryScreen();
GoalInterviewControl goalControl = (GoalInterviewControl)summary.getControls().get(0);
InterviewGoal goal = goalControl.getGoal();
//conduct the interview
while(!goal.isKnown()){
InterviewScreen screen = session.getNextScreen(goal);
renderScreen(screen);
mapValues(values, screen);
TransactionResult result = session.submit(screen);
if(!result.isSuccess()){
//process errors and warnings
}
}
//Now that the interivew is complete, re-render the summary screen
System.out.println();
System.out.println("Interview complete...");
summary = session.getScreenService().getDefaultSummaryScreen();
renderScreen(summary);
//Render a decision report for the goal
System.out.println();
System.out.println("Showing Decision Report...");
if(goal instanceof AttributeGoal){
Attribute goalAttr = ((AttributeGoal)goal).getAttribute();
InterviewEntityInstanceIdentifier goalContext = ((AttributeGoal)goal).getContext();
InterviewScreen decisionReportScreen = session.getScreenService().getDecisionReportScreen(goalAttr, goalContext, DecisionReportFlag.RELEVANT);
renderScreen(decisionReportScreen);
}
//show the data review screen
System.out.println();
System.out.println("Showing Data Review...");
renderScreen(session.getScreenService().getDefaultDataReveiwScreen());
//finally clean up the session and exit
session.destroy();
System.exit(0);
}
/**
* Simple method to render a screen to standard out
* @param screen the screen to render
*/
public static void renderScreen(InterviewScreen screen) {
System.out.println();
System.out.println(screen.getTitle());
System.out.println("------------------------");
System.out.println();
renderControls(screen);
}
/**
* Recursive function to render a set of controls in the given control container
* @param container the container to render
*/
private static void renderControls(InterviewControlContainer container) {
for (Object oCtrl : container.getControls()) {
if (oCtrl instanceof GroupInterviewControl) {
System.out.println(((GroupInterviewControl)oCtrl).getText());
renderControls((InterviewControlContainer)oCtrl);
} else if(oCtrl instanceof DataReviewScreenInterviewControl){
DataReviewScreenInterviewControl dataReviewScreenCtrl = (DataReviewScreenInterviewControl)oCtrl;
System.out.println(dataReviewScreenCtrl.getText());
renderControls(dataReviewScreenCtrl.getUnderlyingScreen());
}else if (oCtrl instanceof GoalInterviewControl) {
GoalInterviewControl goalCtrl = (GoalInterviewControl) oCtrl;
System.out.println("Goal: " + goalCtrl.getGoal().getId() + ": " + goalCtrl.getText());
} else if (oCtrl instanceof InputInterviewControl){
InputInterviewControl inputCtrl = (InputInterviewControl)oCtrl;
System.out.println("Input: " + inputCtrl.getAttribute().getName() + ": " + inputCtrl.getText() + ": " + StringUtils.getDefaultFormattedValue(inputCtrl.getValue()));
} else {
System.out.println(((InterviewControl)oCtrl).getText());
}
}
}
/**
* Maps the input values to the screen
* @param values the input values hashed by Attribute ID
* @param screen the screen
*/
public static void mapValues(Map values, InterviewScreen screen){
System.out.println();
System.out.println("Mapping values...");
//Iterate through the controls on the screen and set the appropriate values
for (Object oCtrl : screen.getControls()) {
if (oCtrl instanceof InputInterviewControl) {
InputInterviewControl interviewCtrl = (InputInterviewControl) oCtrl;
Attribute controlAttribute = interviewCtrl.getAttribute();
interviewCtrl.setValue(values.get(controlAttribute.getName()));
System.out.println("Setting value of attribute '" + controlAttribute.getName() + ", to '" + StringUtils.getDefaultFormattedValue(values.get(controlAttribute.getName())));
}
}
}
/**
* Creates and returns an InterviewSession for the SuperSimple rulebase
*
* @return the InterviewSession
*/
public static InterviewSession createSession() {
/************************************************
* Step 1. Create the Configuration object
************************************************/
EngineConfiguration configuration = new EngineConfiguration();
//set the path to load the rulebases from
configuration.setRulebaseDirectory(RULEBASE_PATH);
//signifies that we want to load rulebases from the file system and use hotswapping mode
configuration.setLoadRulebaseFromClasspath(false);
configuration.setCacheLoadedRulebases(false);
/************************************************
* Step 2. create an InterviewEngine
************************************************/
InterviewEngine engine = InterviewEngineFactory.createInstance(configuration);
SecurityToken token = engine.getSecurityService().authenticateUser("user");
/************************************************
* Step 3. Get the rulebase
************************************************/
InterviewRulebase superSimpleRulebase = engine.getRulebaseService().getRulebase(token, RULEBASE_ID);
/************************************************
* Step 4. Create the Interview Session
************************************************/
InterviewSession session = engine.createSession(superSimpleRulebase, LOCALE, token);
return session;
}
}This code produces the following output:
Person's name
------------------------
Input: text: What is the person's name?: unknown
Mapping values...
Setting value of attribute 'text, to 'Bob
Details about Bob
------------------------
Tell us some more about Bob
Input: date: Bob's DOB:: unknown
Input: currency: What is the amount Bob has in their wallet?: unknown
Input: number: What is the number of fingers Bob has?: unknown
Input: boolean: Does Bob have two arms?: unknown
Mapping values...
Setting value of attribute 'date, to '1999-06-01 00:00:00
Setting value of attribute 'currency, to '150.2
Setting value of attribute 'number, to '10
Setting value of attribute 'boolean, to 'true
Interview complete...
Super Awesome Assessment Summary
------------------------
Goal: Attribute~goal~global~global: Bob is happy.
Showing Decision Report...
Bob is happy.
------------------------
Bob is happy.
Bob is happy.
The person is Bob.
Bob's date of birth is 01/06/99.
The amount Bob has in their wallet is £150.20.
Bob has two arms.
The number of fingers Bob has is 10.
Showing Data Review...
Data Review
------------------------
Default Screen Order
Person's name
Input: text: What is the person's name?: Bob
Details about Bob
Tell us some more about Bob
Input: date: Bob's DOB:: 1999-06-01 00:00:00
Input: currency: What is the amount Bob has in their wallet?: 150.2
Input: number: What is the number of fingers Bob has?: 10
Input: boolean: Does Bob have two arms?: true
.Net code sampleThis sample (CustomInterview.cs) also illustrates how to manually install a default data adaptor.
using System;
using System.IO;
using Oracle.Determinations.Interview.Engine;
using Oracle.Determinations.Interview.Engine.Data;
using Oracle.Determinations.Interview.Engine.Data.Error;
using Oracle.Determinations.Interview.Engine.Local;
using Oracle.Determinations.Interview.Engine.Screens;
using Oracle.Determinations.Web.Platform.Plugins.Data;
using Boolean = Oracle.Determinations.Masquerade.Lang.Boolean;
namespace InterviewSample
{
internal class Program
{
private const string rulebaseDir = @"..\..\rulebase";
private const string sampleRulebase = "sample";
private const string locale = "en-US";
private const string dataBaseDir = "data";
private static void Main(string[] args)
{
System.Console.WriteLine("Sample Rulebase runner");
//we'll use most of the defaults for the engine configuration
EngineConfiguration engineConfig = new EngineConfiguration(rulebaseDir);
//create the engine
InterviewEngine engine = InterviewEngineFactory.CreateInstance(engineConfig);
//generate a default security token and create the session
SecurityToken token = engine.GetSecurityService().AuthenticateUser("guest");
InterviewRulebase rulebase = engine.GetRulebaseService().GetRulebase(token, sampleRulebase);
//To use the existing XDSDataAdaptor we can manually register it by creating one and then adding it to the configuration
if (!Directory.Exists(dataBaseDir))
Directory.CreateDirectory(dataBaseDir);
XDSDataAdaptor dataAdaptor = new XDSDataAdaptor(dataBaseDir);
InterviewSessionConfiguration sessionConfig = new InterviewSessionConfiguration(dataAdaptor, null);
InterviewSession session = engine.CreateSession(rulebase, locale, token, sessionConfig);
//List the currently avalible cases
Console.WriteLine("Currently Avalible Saved Cases: ");
foreach (string name in dataAdaptor.ListCases(token, rulebase))
Console.WriteLine(name);
Console.WriteLine();
//Load a case
Console.Write("Enter the case to load [blank to skip]: ");
string caseId = Console.ReadLine();
if (caseId.Length > 0)
{
try
{
//this will invoke whatever data adaptor is registered on the session
//to load the case
session.LoadData(token, caseId);
}
catch (Exception ex)
{
Console.WriteLine("Sorry, case '" + caseId + "' could not be loaded. Reason: " + ex.Message);
Environment.Exit(-1);
}
}
//Get the summary screen and investigate the first goal on it
InterviewScreen summaryScreen = session.GetScreenService().GetDefaultSummaryScreen();
InterviewGoal goal = null;
foreach (InterviewControl ctrl in summaryScreen.GetControls())
{
if (ctrl is GoalInterviewControl)
{
goal = ((GoalInterviewControl) ctrl).GetGoal();
break;
}
}
//now do the investigation
while (!goal.IsKnown())
{
InterviewScreen screen = session.GetNextScreen(goal);
renderScreen(screen);
string input = System.Console.ReadLine();
submitScreen(session, screen, input);
}
Console.WriteLine("Interview is complete!");
Console.WriteLine("Goal value: " + goal.GetValue());
//Save a case
Console.Write("Enter the name of the case to save this session as [blank to skip]: ");
caseId = Console.ReadLine();
if (caseId.Length > 0)
{
try
{
session.SaveData(token, caseId);
}
catch (Exception ex)
{
Console.WriteLine("Sorry, case '" + caseId + "' could not be saved. Reason: " + ex.Message);
Environment.Exit(-1);
}
}
Console.WriteLine("Hit Enter to exit.");
Console.ReadLine();
}
private static void renderScreen(InterviewScreen screen)
{
Console.WriteLine("Screen Title: " + screen.GetTitle());
//in the 10.x engine, an entity collect control will always be the first control on the screen
bool isEntityCollect = screen.GetControls().Get(0) is ContainmentRelationshipInterviewControl;
if (isEntityCollect)
{
//if it's an entity collect screeen, ask for a ';' delimited list of instance names
Console.Write("Please Enter a ';' list of instances to create: ");||
}
else
{
//in this sample we only have one input control per screen so we'd just ask for a value for this screen
foreach (InterviewControl ctrl in screen.GetControls())
Console.WriteLine(ctrl.GetText());
}
}
private static void submitScreen(InterviewSession session, InterviewScreen screen, String input)
{
bool isEntityCollect = screen.GetControls().Get(0) is ContainmentRelationshipInterviewControl;
if (isEntityCollect)
{
ContainmentRelationshipInterviewControl containmentControl = (ContainmentRelationshipInterviewControl)
screen.GetControls().Get(0);
String[] instanceNames = input.Split(';');
//create our entity instances
foreach (String instanceName in instanceNames)
{
EntityInstanceInterviewControl instanceCtrl = containmentControl.AddNewInstance(instanceName);
//each entity instance also has in input control on it to store the child's name,
//so we'll just reuse the same instance name
InputInterviewControl ctrl = instanceCtrl.GetControls().Get(0) as InputInterviewControl;
ctrl.SetValue(instanceName);
}
}
else
{
foreach (InterviewControl ctrl in screen.GetControls())
{
//this example only support text and statement controls
if (ctrl is TextInputInterviewControl)
{
((TextInputInterviewControl) ctrl).SetValue(input);
}
else if (ctrl is StatementInputInterviewControl)
{
try
{
Boolean value = bool.Parse(input) ? Boolean.TRUE : Boolean.FALSE;
((StatementInputInterviewControl) ctrl).SetValue(value);
}
catch
{
Console.WriteLine("Can not submit screen because value is not a valid boolean value: " + input);
return;
}
}
}
}
TransactionResult result = session.Submit(screen);
if (!result.IsSuccess())
{
//The transaction failed, so we write out the list of errors
Console.WriteLine("ERROR: could not submit screen due to the following error(s)");
foreach (Error error in result.GetErrors())
Console.WriteLine(error.GetMessage());
Console.WriteLine("Since the transaction failed, the same screen will now be re-displayed.");
}
else
{
//The transactions suceeded but we may have warnings or events
Console.WriteLine("Transaction suceeded with " + result.GetWarnings().Size() + " warning(s) and " +
result.GetEvents().Size() + " event(s) fired");
Console.WriteLine("The next screen will now be displayed.");
}
}
}
}
For information relating to the integration of the Interview Engine with an external data source, refer to Data Adaptor - Common Scenarios where pre-seeding and interview with data, saving data, auto-saving data and using the Data Adaptor to handle data integration are discussed.
Users require a transcript when going through any interview, so that they have:
The client system running the Web Determinations interview needs to be able to provide this, and also be able to define what data from the interview session is displayed in the transcript, and how it is displayed (layout).
Oracle Policy Modeling allows rulebase authors to create reports of the Web Determinations interview, accessible by the user from the Summary screen. With the report links, users can view and download information transcript about the interview session as a document.
The Document Generator plugin is an Engine Session plugin to the Interview Engine that allows plugin developers to generate those documents in any document type, and also define the document layout and which session data is displayed. A Document Generator is known by the document type it provides; for example, HTML, PDF, XML and so on.
By default, Web Determinations ships with two Document Generators for HTML and PDF. For more information about using these, see the topic, Use the default Document Generator.
Multiple Document Generators can be used together during a Web Determinations interview session, allowing users to view the interview transcript in various formats. This is different to other plugins where only one plugin can be used during an interview session; for example, Data Adaptor plugins. Each Document Generator provides a specific document type, therefore it is imperative that all Document Generators registered during a Web Determinations interview, must provide unique document types.
Document Generator plugin overview
Document Generator - sample code
Some screens and attributes during a Web Determinations Interview are complex or ambiguous and need further explanation. The Commentary functionality in Web Determinations allows the rulebase author to provide extra information about screens and attributes, which can be accessed by the user during the interview when more information or explanation is required. The Commentary functionality also allows an external web page to be displayed as commentary.
When commentary is available for a screen or attribute, the attribute/screen label is rendered as a link that the user can click on to view the commentary information. By default, commentary is displayed in a frame to the right of the interview screen. Optionally, it is possible to configure Web Determinations to display commentary information in a new window (more about the configuration in Configuration files). Attributes and screens do not have to have commentary, and it is possible for a Web Determinations interview to have commentary available for some screens/attributes only.
Commentary plugins are Engine Session plugins that manage commentary in a Web Determinations interview. The main functionality is to determine whether commentary for a screen/attribute is available, and to be able to provide the commentary content to those screens/attributes when requested. Commentary plugins have the flexibility of being able to retrieve content from datasources accessible in a Java/.NET class, or returning a URL to be displayed in the commentary frame/window. The ability to return a URL allows Commentary plugins that can make use of a client's existing information webpages.
Web Determinations ships with a default Commentary plugin that uses commentary HTML files generated from Oracle Policy Modeling by the rulebase author. More about the default Commentary in Use the default commentary.
Like many other plugins, only one Commentary plugin can be registered per Web Determinations interview.
Sample code (RedirectCommentary)
For a description of the specific engine and platform events, including details about the objects contained by the events (accessible and modifiable by associated event handler implementations) and the mapping between the events and the event handler interfaces to be implemented by plugin classes in order to be registered as valid event handlers for the respective events, go to the topic, Events and event handlers.
For information regarding the installing and registering of Web Determinations extensions, refer to the topic Plugin loading, invocation and discovery.
Introduction to Web Determinations extensions
Web Determinations extensions - the technical details
Plugin loading, invocation and discovery